Brooks Stevens Archives
Overview
The Brooks Stevens Archives is one of several special Museum Collection archives and was acquired from the Stevens family in 1997. The archive is composed of nearly 20,000 visual materials spanning Stevens’ entire career.
Collection Archives are available by appointment only. Please contact collection@mam.org

Biography
Early Years
Clifford Brooks Stevens was born on June 7, 1911, in Milwaukee. He was from the first a person who liked to design and build, and fortunately for the history of industrial design, he never stopped. When he was young his father, William Clifford Stevens, pushed him to pursue his childhood hobbies, especially when the future designer was struck down with a severe case of polio at the age of eight. All of his limbs stiffened and his right arm was rendered virtually useless. Doctors predicted that he would not be able to walk again. Stevens’ father, however, was not a believer in bed rest. He piled sketchpads and model kits next to the boy’s bed and encouraged him to build one miniature airplane and boat after another. He also challenged Brooks to ride a bicycle and then to swim a mile in a pool, promising to buy him a Model T Ford when he succeeded. “They must have hauled me out hundreds of times short of that mark,” Stevens later said. “But I finally got that car. My father knew how to motivate me.”
Stevens first thought he might translate these interests into architecture, and enrolled at Cornell University in 1929 to study the subject. It was the only time he lived outside of Milwaukee, and by his own account, the experience made only a limited impression on him. “If I spent as much time on the bank building as I did on the cars that I drew on the rendering in front of the building,” he remembers his professors telling him, “I could have been a good architect.”
Stevens left Cornell in 1933 without a diploma, and returned to Milwaukee to work as an inventory manager, first for a pair of soap companies, and then for a grocery supply firm called Jewett and Sherman. Bored and restless, he persuaded the head of the company to let him redesign some of the product labels. He also won a contest to redesign the company logo for his father’s employer, Cutler-Hammer. These opportunities proved to be the first step towards Stevens’ career as an industrial designer. He was aware of the early stirrings of this new profession in New York, and decided to pattern himself after such men as Raymond Loewy, Walter Dorwin Teague. All of these designers had offices in New York City, but Stevens decided to stay right where he was. Milwaukee, he said, was where the business was.
First Office
Stevens opened his first office on July 1, 1935, at 340 North Milwaukee St. By 1939 the office had grown to a staff of five, and Brooks Stevens Industrial Design could boast of thirty-three accounts to its name. By the following year it had over fifty. Stevens’ personal life also was marked by a notable addition when he married Alice Kopmeier in 1937. The young newlyweds built their own ultra-modern house in Fox Point, just north of Milwaukee. Designed by Stevens in conjunction with local Fitzhugh Scott, Jr., the building still stands today as one of Milwaukee’s most significant examples of modernist domestic architecture. Alice and Brooks Stevens would go on to live in the home for five decades and raise four children together.
Meanwhile, Stevens was proving himself a master at salesmanship from his earliest days in business. As soon as the firm had its first designs under its belt, Stevens began delivering slide lectures on “Industrial Design and Its Practical Application to Industry.” These talks invariably stressed his main selling point: that design would pay for itself many times over. This argument was tested during World War II, a period of national emergency in which market appeal did not seem to have the same importance as it had during the depression. Stevens did execute a few designs with a military or “home front” application, but his real success during the war was in converting military manufacturing into civilian consumer products. He turned the army Jeep into a station wagon, and then a stylish little touring car called the Jeepster.
Organization Man
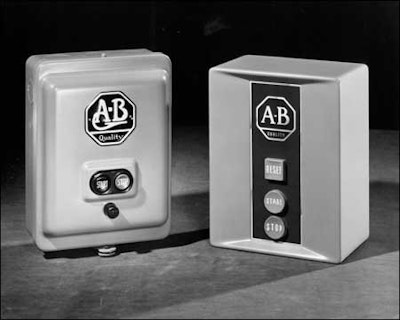
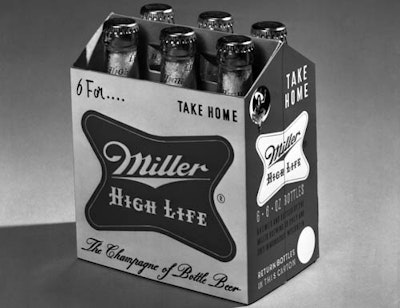
Stevens burst out of the war era with a new sense of purpose. Arguing that “an industrial designer in today’s business world should be a business man, an engineer and a stylist, and in that direct order,” he sought out high profile commissions and relationships with Milwaukee’s most prominent manufacturers, including Miller Brewing, Allen-Bradley, the Outboard Marine Company, and Harley-Davidson. In 1947 he unveiled a design for a new train called the Olympian Hiawatha, operated by the Milwaukee Road. Outfitted with a spectacular glass-enclosed observation car called the Sky Top Lounge, the train was one of the last of the great “streamliner” trains that roared across America.
During this time Stevens also became the only Midwestern founder of the Society of Industrial Designers (SID), and the first industrial designer ever to be honored with a one-person museum retrospective. His show at the Milwaukee Art Institute, in 1950, got rave reviews from the local press. “Never before in the history of the Institute has it welcomed an event of this magnitude,” the Milwaukee Sentinel exclaimed. “Never before have such peculiar and violent assaults been made on the classical edifice on North Jefferson Street.” Stevens later created his own Auto Museum, which displayed both vehicles of his own design and those that he admired.
Stevens’ fame gained a touch of infamy in 1954, when he was scheduled to deliver a talk to the local advertising club in Minneapolis. Stevens arrived in the city the night before, and impulsively hit upon the catchphrase “planned obsolescence” as a description of the industrial designer’s mission. Probably without giving the words much thought, he used it as the title of his speech the following day, and the phrase would eventually become his major lasting contribution to design theory. Stevens’ definition of the concept-“instilling in the buyer the desire to own something a little newer, a little better, a little sooner than is necessary”-sounded innocuous enough, but his description of design as a marketing ploy immediately became controversial. Planned obsolescence continues to be a contentious and much-discussed aspect of industrial design to this day.
Legacy
In 1954, Stevens was asked to name his favorite design among all those his firm had handled, and had responded, “none, because every one would have to be restudied for the tastes of tomorrow.” At the end of his career, he had not changed his mind. “Would I change anything now that I did in the past?”, he said. “Hell yes! Everything! Because it’s all outmoded.” By the time he retired, turning the management of his design company over to his son Kipp, he had helped to shape approximately 3,000 products for almost 600 clients over the years. Many of his staffers, who had played such a large role in shaping Stevens’ vision, went on to become successful independent designers in their own right. The landscape of America bears his indelible stamp in ways both big (the original concept of the SUV) and small (the wide-mouthed peanut butter jar).
Brooks Stevens died at the age of 83 on January 4, 1995, the last surviving founder of the Society of Industrial Designers. His passing was, literally, the end of an era. Over the past decade a group of Milwaukee institutions, including the Michael Lord Gallery, the Milwaukee Institute of Art and Design, and the Milwaukee Art Museum, have created exhibitions and publications that ensure the preservation of Stevens’ memory. The Milwaukee Art Museum is now the custodian of the many archival materials that he gathered throughout his career. Despite these efforts, however, Stevens’ many contributions to design history are only beginning to be measured.
Frequently asked questions
A manufacturer hires an industrial designer to help “style” a product so that it will work better or be more successful in the marketplace. In a way, a well-designed object is its own advertisement. Most companies today have in-house designers on their staff, but in the 1930s the profession was brand new. Previously, engineers had decided how a product should look, and they were usually more concerned with utility than with “eye appeal,” as Stevens put it.
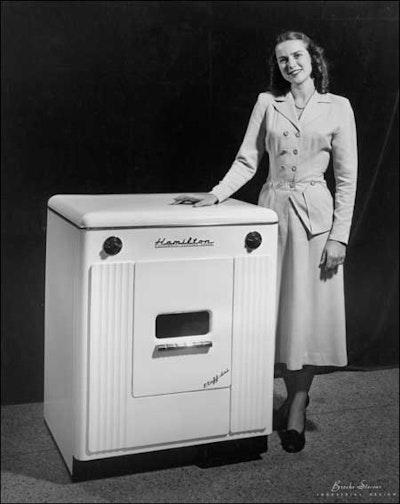
As one of the country’s first industrial designers, he helped to decide how many of the objects that surround us should look. He is particularly noted for his automotive designs-such as the Willys-Overland Jeepster, the Studebaker Gran Turismo Hawk, and the Excalibur-but he and his firm created designs for almost anything you can think of: motors, toys, packages, appliances, bicycles, planes, trains, and even clothing. Also, Stevens was a design theorist. He coined the term “planned obsolescence,” which is still the subject of much debate today.
Even as a child Stevens was interested in cars, boats, and trains, and liked to draw them and build them using model kits. His father, an engineer for the local machine tool firm Cutler-Hammer, helped to support these interests. After an unsuccessful stint at Cornell University studying architecture, Brooks Stevens returned to Milwaukee and soon thereafter opened a design office, inspired by the example of the pioneers of the profession in New York City.
The streamlined style of Stevens’ early work owes a great deal to the work of New York designers who emerged in the 1920s, such as Raymond Loewy, Henry Dreyfuss, Walter Dorwin Teague, and Norman Bel Geddes. But he was more consciously influenced by a custom automobile designer from Europe named Count Alexis de Sakhnoffsky. Stevens owned a car (made by the Cord Automobile Company of Indiana) that Sakhnoffsky had customized, and traveled to see the count in Chicago in 1934. Impressed to hear that the elder gentleman made over $300 a day for his auto designs, Stevens resolved to enter the field himself. His early car designs were sometimes quite reminiscent of the count’s creations. Ironically, Sakhnoffsky fell on hard times in the 1950s and came to work for Stevens as a staff designer for a short time.
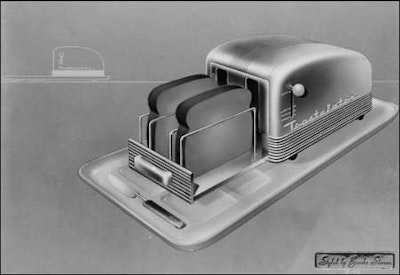
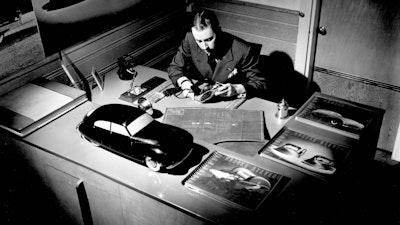
His process was similar to that of many other industrial designers of his era. After being hired to design (or redesign) a product, he would usually do some quick sketches. These would have the basic lines of the new design and get across the main idea of its look and function. Next, he would assign the project to one of his staff designers, who would take his sketch and make a more finished “rendering” or drawing of it. Sometimes these were beautiful images in their own right, with subtle coloration in airbrush or marker. Usually several renderings, showing various alternatives for the design, were made. Stevens would then meet with the client and decide which version was best. Next, a three-dimensional model (either scale or full size) was made by one of Stevens’s specialist modelmakers. In the early days of his career, this was done by hand using sculpting clay, but during the 1960s the firm began using cast fiberglass. After being formed the model was painted and embellished with metallic tape, glass, and other materials.
No. Stevens did many “prophetic” designs that he never intended for production. Usually these were ideas for the future, which might not be possible or practical to build with today’s technology. Sometimes they were used to give clients ideas for new products. Also, Stevens and his staff did create many designs that they hoped to see produced that never made it. Many of his fully realized plans for Studebaker, for example, never got to the factory floor because the auto manufacturer went out of business soon after he was hired.
He was full of energy, worked almost every day, and most importantly, had many people helping him. When he was in his prime, Stevens was actually more of a salesman for his own firm than he was a designer. He traveled the United States and even Europe drumming up new business and seeing his many schemes to completion. His staff of twenty draftsmen, modelmakers, and engineers did most of the actual design execution, often but not always based closely on Stevens’ original ideas.
Yes. Brooks’ son Kipp Stevens is the head of the company (which is still called Brooks Stevens Design). You can learn more about their work by visiting brooksstevens.com.
Yes, for over forty years. Stevens opened his first design office on July 1, 1935, and went into semi-retirement in 1978.
He always said that he stayed in Milwaukee because that’s where the business was, and it was true. Unlike the many designers in New York, Stevens had the advantage of proximity to a wealth of manufacturers.
Many of them did-Allen-Bradley, Harley-Davidson, Cutler-Hammer, and Edmilton were among his early clients in the city. But he also worked for companies elsewhere in Wisconsin, in Chicago, or even in other parts of the country.
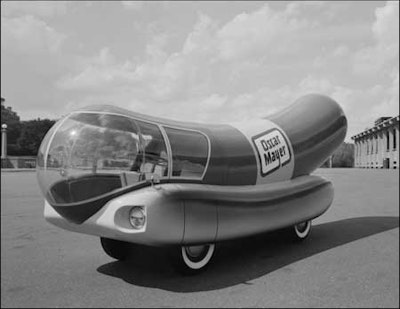
It’s hard to compare Stevens’ many market successes. How do you rate a popular car, like his Jeep station wagon, against the Miller Brewing logo—which has appeared on millions of trucks, cartons, bottles, cans, advertisements, and even buildings-or the Oscar Mayer Wienermobile, which isn’t sold at all but is an amazingly effective promotional tool?
Its neck was too narrow, so it was impossible to get the peanut butter out of the jar’s shoulders. Stevens insisted on the wide mouth, he said, because he loved peanut butter so much that it frustrated him to waste any.
Stevens usually only worried about the body, or shell, of the cars he designed. The engine and chassis (or frame) were created by the client’s own engineers. Sometime Stevens did his own custom cars, such as the Scimitar, the Gaylord, and the Valkyrie, and in those cases he selected appropriate engines and helped to design the chassis.
Stevens had a very severe case of polio at the age of eight. For a time he was unable to walk without help, but after a regimen of exercise (especially swimming) he regained almost full mobility. He always had a bit of a limp and suffered stiffness and pain in one half of his body. Towards the end of his life, more severe symptoms returned and he was eventually forced into a wheelchair.
Stevens actually is famous, at least in Milwaukee, where most people have heard of him. His name is probably is not as well-known as it should be nationally, however, because he stayed in Milwaukee, out of the limelight. Also, Stevens’ personal papers were not available to researchers until recently, so it was difficult for early design historians to learn much about his career.
No. Product branding is a centuries-old idea. As long as there have been companies big enough to distribute their goods widely, there have been attempts to build up brand recognition and even brand loyalty. The mass media brought an explosion of scientific brand promotion in the twentieth century, and industrial designers were only a small part of that phenomenon. Stevens did, however, do a lot of work with branding. His most ambitious projects were an ongoing series of package and logo designs for Miller Brewing in the early 1950s, and a 1965 campaign for the Minneapolis-based firm 3M, in which his unified package design was applied to over 35,000 different products.
The irony is that more than any of these three things, Stevens was a great salesman. He actually wasn’t very interested in the details of running his own business, which went through some financial troubles now and again. For all his talk of maximizing his clients’ profits, he seems to have been fairly indifferent to his own personal wealth. He also wasn’t necessarily a skilled engineer, and he couldn’t even draw very well. He was an all-around “idea man,” however, and if he needed to help make a decision about engineering or the profile of a particular shape, he could.
Sometimes he suggested titles for his designs. He claimed, for example, to have come up with the name “Wienermobile,” which was originally called the “Wiener Wagon.” But usually his clients already had a name for their product when they came to Stevens.
It has a big storage compartment in the back for carrying promotional items—Wiener whistles, stuffed Wienermobiles, and so on. In the front is a small sleeping area and the cockpit for the drivers.
Stevens did not begin working for Studebaker until 1961, when the company was already in a lot of trouble financially. The auto manufacturer closed its South Bend factory in December of 1963. As a result, the only Stevens designs that Studebaker produced were the 1962 and 1963 Larks and Hawks and the 1963 Wagonaire. He did create several prototypes for other cars, projecting designs for the company all the way out to 1968.
Before Studebaker hired Stevens, they had employed New York designer Raymond Loewy to style their cars. When Stevens replaced Loewy there were hard feelings between the two, and the rift between the two designers never fully healed. Stevens also had competitors in the Midwest, such as Harold Van Doren in Toledo, Dave Chapman in Chicago, and Viktor Schreckengost in Cleveland. Chapman was a rival in the outboard motor field and for a time was hired by Stevens’ most important client, the Outboard Marine Corporation; Stevens also competed head-to-head with Schreckengost in the area of pedal car and tricyle design.
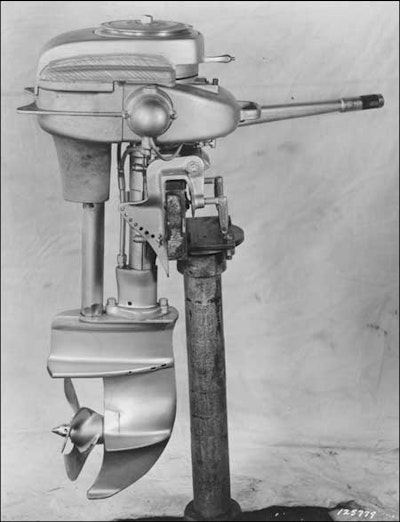
Well, it’s actually hard to say who his most important client was. At various times, Stevens’ design firm was almost overwhelmed with work for a single client. This happened in the 1950s with Miller Brewing and Kaiser-Frazer, and in the 1960s with Studebaker and 3M. But over the course of his entire career, Stevens’ relationship with OMC was always extremely strong, partly because he was a close personal friend of Ralph Evinrude. Stevens’ staff designers (especially Gordon Kelly and John Bradley) executed literally hundreds of designs for OMC’s Evinrude and Johnson outboard motors, Lawn Boy mowers, and Cushman scooters, carts, and motorcycles.
Stevens lived in an era when people were not as conscious of threats to the environment as we are today. All the same, however, he was always careful to say that planned obsolescence was not the same as organized waste. He envisioned “obsolete” products going on the secondhand market, where they could be purchased by people of lower incomes. That way, he reasoned, everyone would have access to more and better goods. Of course, it hasn’t always worked out that way, but perhaps it’s unfair to blame Stevens for that.
Definitely. In Stevens’ day, the designer was a celebrity whose name and persona added dash and style to a company’s public profile. Today, very few designers are famous. Most work within companies’ “in house” styling departments, rather than as independent freelancers as Stevens did. Also, most design today is done on computer. The laborious techniques of hand rendering and modeling are rarely practiced any longer.
Ultimately, Stevens’ philosophy was no different from that of most of his peers-or if it was, it was a difference in emphasis rather than a fundamental philosophical difference. What stands out most about his writings on design is his honesty and directness. He never made any apology for the fact that his main objective was to make the cash register ring. And unlike most of his peers (who also talked about their commitment to the profit motive) he acknowledged the fact that all of his designs were ephemeral. While other designers of his era like Walter Dorwin Teague or Henry Dreyfuss often spoke of perfecting a design so that it could be used and sold forever, Stevens envisioned good design as always changing from year to year, so that it could keep up with new technologies and new tastes. The way Stevens saw it, this “planned obsolescence” keeps the wheels of production and consumption going at full tilt, to the benefit of the whole economy. For better or worse, his pragmatic vision-a design of constant flux that prizes the new above any objective standard of quality- is the kind of design that we live with today.
Lesson plans
-
Grade level: 6–12
We live our lives surrounded by objects, some hardly noticed, others cherished. Whether purely functional or beautiful to look at, the success of an object depends on the effectiveness of its design. Industrial design is a branch of artistic activity that came into being as a result of the need to design machine-made products, introduced by the Industrial Revolution in the 18th century. The purpose of industrial design is to ensure that goods satisfy the demands of fashion, style, function, materials, and cost.
The following interdisciplinary lesson plans are developed to accompany the Milwaukee Art Museum’s Brooks Stevens archives and Industrial Strength Design: How Brooks Stevens Shaped Your World exhibition. They are intended primarily (but not exclusively) for middle and high school teachers who wish to introduce their students to the field of industrial design and the processes industrial designers utilize to design creative, useful, safe, and appealing mass-produced objects. The lesson plans are developed to be used as a sequence of activities building on previous knowledge or as independent lessons to supplement school curriculum as needed. You will find information about how each lesson plan matches State of Wisconsin academic standards, lesson objectives, materials needed, how to implement the lesson, and background information, along with additional suggested activities for classroom use.
Lesson 1: What is industrial design?
Summary: Introduce students to the field of industrial design as a career and a field of art. Explore the processes used by industrial designers to design useful, safe, and appealing mass-produced objects. Students will select an object from their home or classroom and redesign it to improve its function, feel, and/or appearance.
Lesson 2: Design a better bag
Summary: Students explore the creative process and understand the invention/innovation process through examining how paper bags are constructed. Teams of students work cooperatively to design, innovate, and then build their own paper bag models designed to hold as much weight as possible in proportion to its volume.
Lesson 3: Design a new product
Summary: Teams of students work cooperatively to choose the ten greatest inventions from a list of likely candidates and compile the list in a graph. Teams of students work cooperatively to design, invent, and build a model of something new, useful, or decorative to solve a problem using any combination of materials provided.
Lesson 4: You can't sell this thing
Summary: Introduce students to new product trademarks/logos, packaging, and advertising. Teams of students will design and create a logo/trademark, packaging box, and poster for advertising their new product/invention. They will present their new product/invention, marketing items, and information about the marketing target audience, cost to produce, selling price, and storage/handling to the class.
Lesson 5: In the year 2121
Summary: Students research the advances of an invention’s industrial design over decades or centuries. They then project improvements and innovations for the future in drawings and descriptive pros.
Gallery